
Two years before the COVID-19 catastrophe, the Cantus Youth Choirs directors were looking for a way to celebrate our 10 year anniversary. We wanted to include alumni, who over the last 10 years, have spread throughout the entire world! We settled on the idea of a virtual choir that we would premiere at our Season 10 Finale Concert.
Well, COVID-19 hit, and our plans to premiere the music video at a live venue fell through. We decided to premiere it on YouTube at the exact moment our curtain would have opened on our concert.
Enough back story.
I’ve been asked by many of my musician friends how we did our virtual choir videos. So … here you go.
Here are the tools you’ll need to make this happen. I suspect that 90% of you will see the cost and specialties required and exclaim, “What?! This is hard! Why isn’t there an app for this?!” Which is why we need to all take a minute and recognize the brilliance of Eric Whitacre and his team for the first virtual choir. No, it’s not easy, but it is totally worth it!
(I admit that there are certainly easier ways to do this, but if you’re handling hundreds of videos … you have to go pro).
You’ll need some tech
I knew that we’d be receiving hundreds of submissions, so I knew that a “text me your video” process would be overwhelming. You’ll need a pretty powerful computer to handle all of the video (I don’t think your tablet or smartphone is going to get the job done). I used a 27-inch iMac with 16GB of memory and my project used 120GB of storage. I was wishing for just a bit more processing power once I got to layering nearly 300 videos.

WordPress
Free
This is the platform that our website is built on. About 35% of all websites in the world are powered by WordPress.

WPEngine Hosting
$600/year
We get a nonprofit rate from WPEngine, the best WordPress hosting environment we’ve found.

Gravity Forms Plugin
$59/year
A powerful plugin that allows you to build online forms, a critical component of collecting user submissions.

AddPipe Subscription
$600/year
Video is heavy. You need a powerful engine to capture and store your video. Powered by Amazon Web Services.

Avid ProTools
$299/year
I’ve used GarageBand, Logic Pro, and Avid ProTools for years. All three of these are excellent. For this project, I used GarageBand and Avid ProTools. GarageBand is a native to Mac. ProTools is the industry standard.

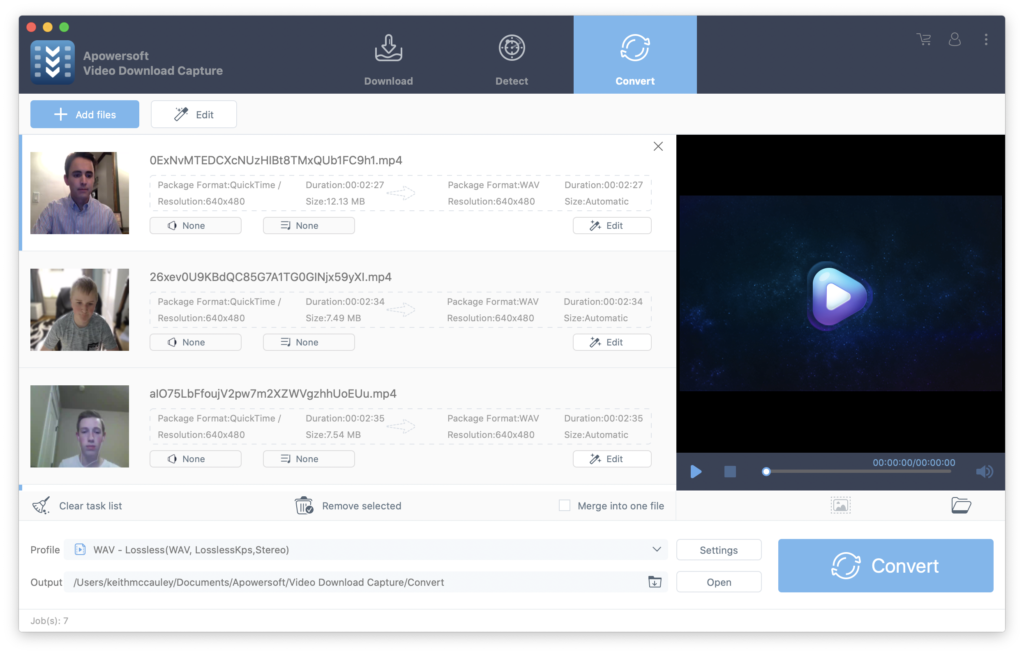
Apowersoft Video Capture
Free
I used this software to rip audio files from the video files so I could mix them in GarageBand or ProTools.

Finale Music Notation
$600
If you’re doing any arranging/composing, or sing-a-long videos, you will need Finale (or something similar) to generate sheet music and MIDI files.

Motion
$49
A special effects generator. I used this to create drop zone templates for my video grids. This automates some of the process.

Final Cut Pro
$299
Your virtual choir WILL be a video, so you’re going to need something that can edit video. I prefer using professional grade software, but something like iMovie could also probably do the trick.
You’ll need people with skills
I don’t want to scare you away from doing a virtual choir, but it is not for the faint of heart. You will need a group of specialties to pull this off. I’ve been working in audio, video, arranging, and web development for 2 decades, so I ended up wearing most of these hats:
Licensing Broker
If you’re not doing an original composition, you need someone to make sure that your project is licensed. If you’re going to release the audio, use CDBaby (mechanical license). If you’re going to release on video (sync license), use Easy Song Licensing and WeAreTheHits.com.
Composer/Arranger
Jesus Gomez
If you’re doing an original composition or a cover of someone else’s song, you need to get it notated for your instrumentalists to play and your sing-a-long videos. If you’re doing a cover, you’ll need a print license. I get this by publishing it (legally) to SMP Press.

Web Developer
This person will need to be a WordPress expert. Someone that can successfully deploy your sing-a-long videos and integrate WordPress, Gravity Forms, and AddPipe to collect submissions.

Audio Engineer
Me, Jason Ringelstetter, Stoker White
Someone will need to create audio for your sing-a-long video, record your instrumental back track, edit submitted audio, and develop your final audio mix/master.

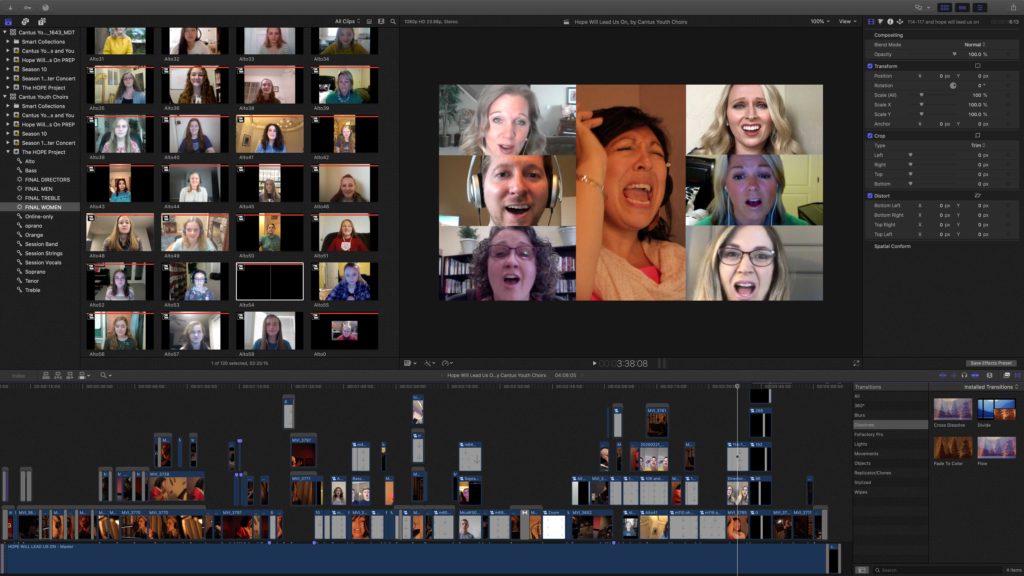
Video Editor
The video editor takes all of the submitted videos and grids them out, syncs the video to the final audio mix, and preps the video for (legal) release on YouTube or Vimeo.
Step-by-step guide on how to build a virtual choir
1. Get permission, let’s be legal
We picked Hope Will Lead Us On by Barlow Girl as our virtual choir song. We commissioned Jesus Gomez to arrange it for youth choir, SATB choir, string quartet, electric bass, piano, guitar, and drums. MAKE SURE IT’S LEGAL. The last thing you want to do is get through a project and have to shut it down. LICENSING TAKES TIME.
We needed three licenses:
- We got a limited-use license for that arrangement through Hal Leonard. This license allowed us to arrange the song … not publish the song, arrange the song. Asking permission from the composer doesn’t count.
- I secured a mechanical license through Easy Song Licensing. This allowed us to release an audio recording on Apple, Google, Amazon, Spotify and a million other providers through the distributor CDBaby.
- I also secured a synchronization license through We Are The Hits. This allowed us to release a legal YouTube video performance of our virtual choir.
2. Arrange the song
We arranged the song in FINALE (or, I think Jesus Gomez prefers Sibelius). Once approved, we distributed our legal music to instrumentalists and singers.
3. Create the scratch track
The scratch track is what the instrumentalists listen to when they record the backtrack. It’s basically the metronome that allows everything down the road to get synced together. I created my scratch track by exporting an MP3 from FINALE. I also recorded some scratch lead vocals with my Yeti in GarageBand so the instrumentalists could follow along better.
4. Record and mix the backtrack
The backtrack is the accompaniment. We booked studio time at The Tonic Room Studios in Boise and recorded drums, keys, electric bass, electric guitar, and strings. Each instrumentalist had the scratch track playing in their headphones. Jason Ringelstetter at The Tonic Room mixed all of our instrumentation for epicness!
Videographer and Cantus Alumnus, Zach Sawyer was present at the shoot to capture our instrumentalists playing. We wanted to incorporate some studio footage in our end video.
4. Record lead vocalists
I flew down to Salt Lake City, where both of our lead soloists were living: the lovely and talented Amy Whitcomb and Michelle Pedersen. We booked time at Funk Studios with Stoker White and recorded their parts.
Videographer Zach was also in Salt Lake to capture footage of our lead vocalists.
5. Create sing-a-long videos
We need some way to sync our at-home singers with the backtrack AND the final video project. And every choir director knows how important it is to have clear entrances, cutoffs, sibilants, etc. So I put on my fave blue suit, hung a sheet, and videoed myself conducting the songs. Here’s the sing-a-long video of the tenor part:
Then, using a free screen recording tool, I recorded my scrolling FINALE playback and then layered the videos together. And, because my instrumentalists recorded to my scratch track, it all synced perfectly!
6. Deploy to the web
I built a mini website within my site to manage this entire project. I needed a place where singers could learn about the project, post updates, practice with the sing-a-long videos, and submit their videos. (This site has since been updated to announce the premiere).
I purchased a subscription to AddPipe, which gave me access to a video capture tool that I could embed on my site. This allowed users to click a RECORD button on a webpage and their built-in webcam would record them. I also had the option for them to upload a video directly from their device.
I built a Gravity Form that posted their video to the AddPipe server, and to my submissions page, and capture some basic info from the singer: their name, part, phone number, and email (so they could get updates and so I could get a hold of them if there was something wrong with their video).
8. Collect user-submitted videos
We had everything set up and collected videos for a year and a half. Once the deadline passed, I bulk-downloaded the user videos to my computer (using a Google Chrome extension) and backed them up on my Dropbox. (Data redundancy is our friend.) The 300 videos were about 7GB.
7. Rip audio from user-submitted videos
I needed to create a master audio track that allowed me to mix levels for each of my instruments (sopranos, tenors, piano, electric guitar). To do this, I used the convert feature of Apowersoft’s VIDEO DOWNLOAD CAPTURE software to bulk-extract ALL the audio clips from the video. (The original video clips still have their audio, which will be critical for syncing the individual videos to the master audio track when we put it all in FINAL CUT PRO). This went refreshingly fast.
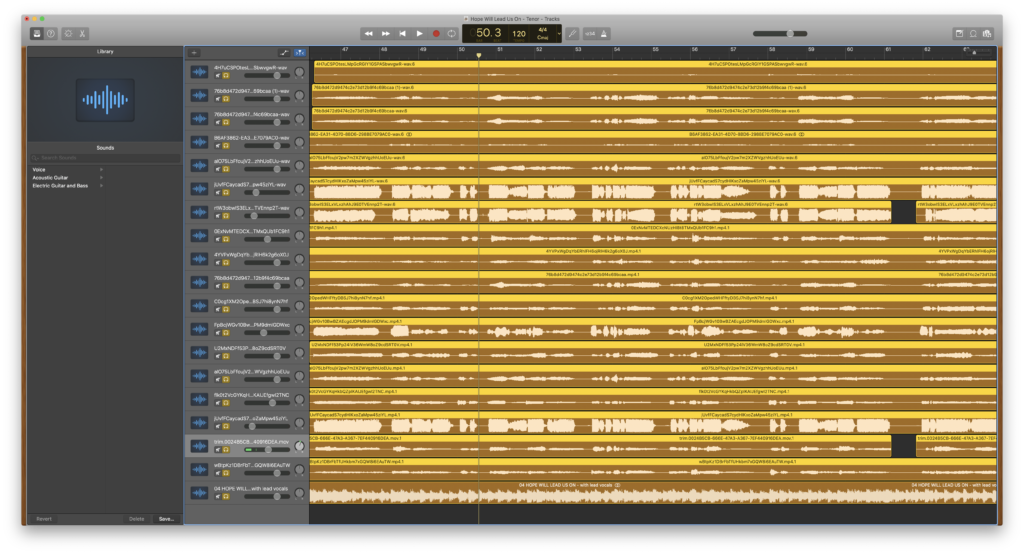
8. Create a mix for each voice part
I imported all of my tenor tracks and created a section mix. This allowed me to adjust volume levels for an optimal blend and clean up any entrances and cutoffs. I did this for EACH singer for each voice part: Treble choir, Soprano, Alto, Tenor, Bass. I used GarageBand for this step (though ProTools is great too). This took SEVERAL days.
9. Create your final audio mix
Once you have all your choral tracks mixed like you want them, drop them in to your final audio mix. My audio engineer at Tonic Room Studios used ProTools to layer all of my choir tracks into the final project.
Once I got a final mix from my engineer, I got it mastered through emastered.com. Mastering makes your audio louder, more crisp and full. Seriously, it’s surprising the difference it makes.
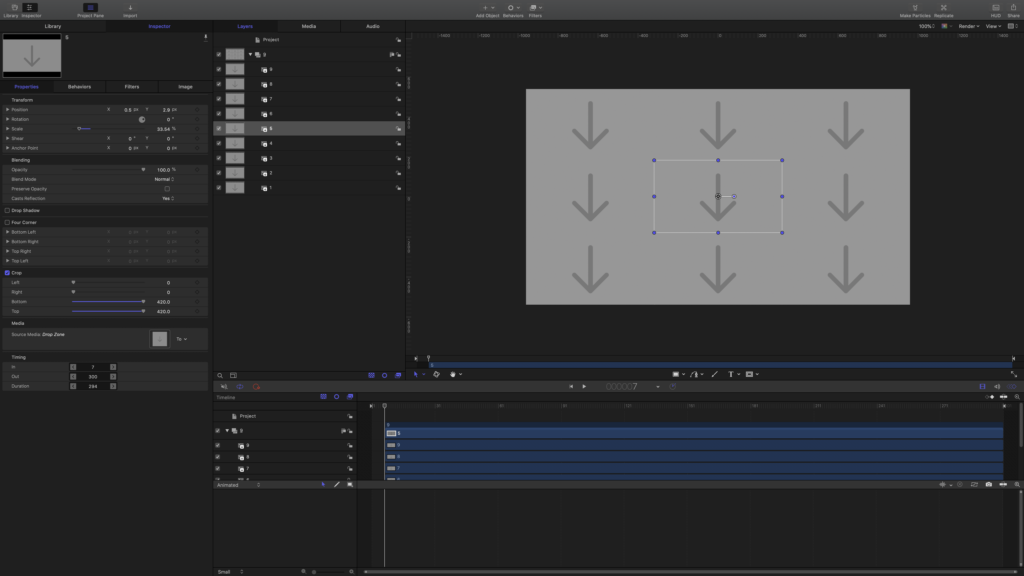
10. Create drop zone templates for video “grids”
Congratulations on making it this far! Now it’s time to start putting it all together. Using Apple MOTION, I created several grid templates with drop zones. This allows me to drop the user videos onto the zone and pan/scale until their face is optimally placed in the frame.
Download Video Grid Drop Zone Templates
Download my MOTION video grid templates. They’re not perfect, sorry, but they work. To activate (on a Mac), download, unzip, and then drag and drop the Video Grid Drop Zones folder to Movies > Motion Templates > Generators folder. You should then be able use them from within Final Cut Pro by browsing to the Generators Sidebar.
11. Sync all videos and build your sequence
This part TAKES FOREVER. Because all of your users will start recording at a different point, you have to sync the videos to the master audio track. I could write a whole post about how I did this. Once complete, I could start dropping the videos into the drop zone templates I made in step 10.
12. Publish!
Once you’ve finished sequencing out all your video, go ahead and permit yourself a good cry. I actually spent the next day in bed with adrenaline crash symptoms (it’s real)! Once you’ve recovered, publish your video to the platforms (YouTube, Facebook, Vimeo, etc.) that you licensed. I like to publish to YouTube via WeAreTheHits.com.
Good luck.
Check out our WIDE AWAKE virtual choir. This was a much smaller project composed of 17 user videos.